Unleash your Artistic Potential with the Breakthrough Figure Posing App for the Artist
Pose Tool 3D for Artists
Create Any Pose On Your Device
"Are you an artist looking for a breakthrough Figure Posing tool? Look no
further! Pose Tool 3D app has been declared one of the Top 10 must-have apps
by ImagineFX magazine. With this
app, you can have your very own reference model
with you at all times. The easy-to-use pose interface allows you to create any
pose quickly and easily, and you can pose both male and female figures.

The
coolest feature of all is that the figures have no constraints, allowing for
geometry to intersect and giving you the ability to create both realistic and
extreme poses. Whether you're 3D sculpting, drawing, doing manga, illustration,
character
design, animation, storyboarding, or creating comic books, this app has you
covered."
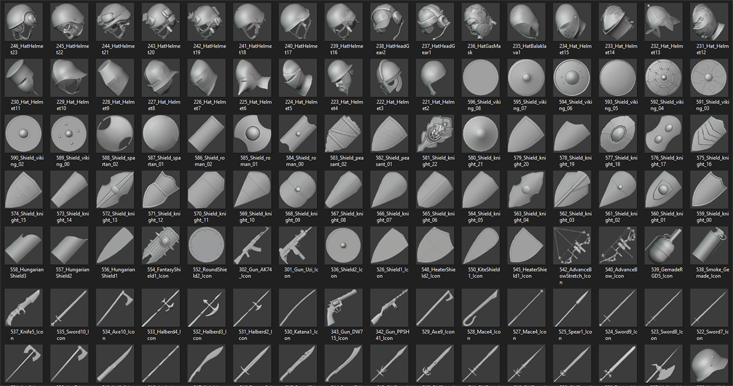
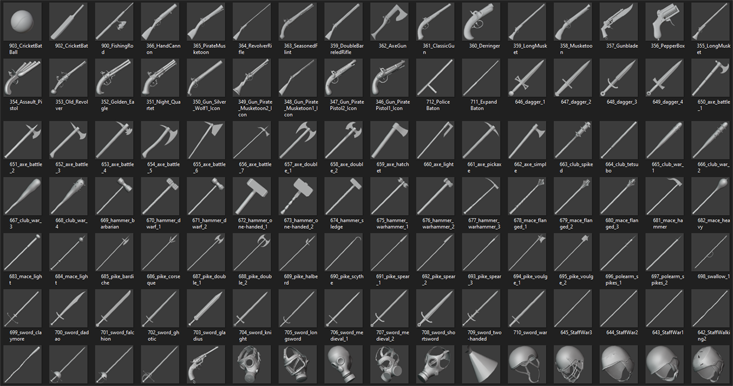
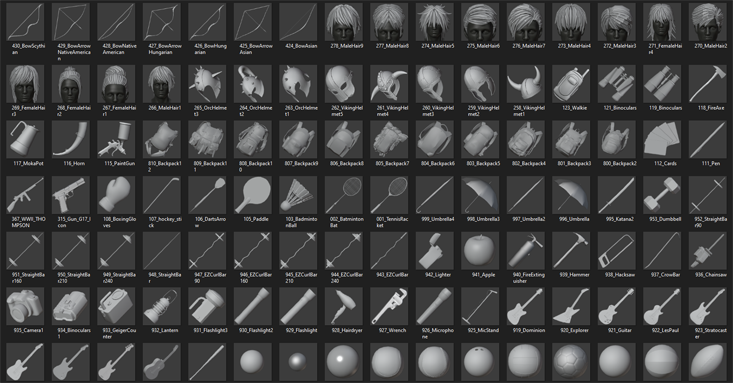
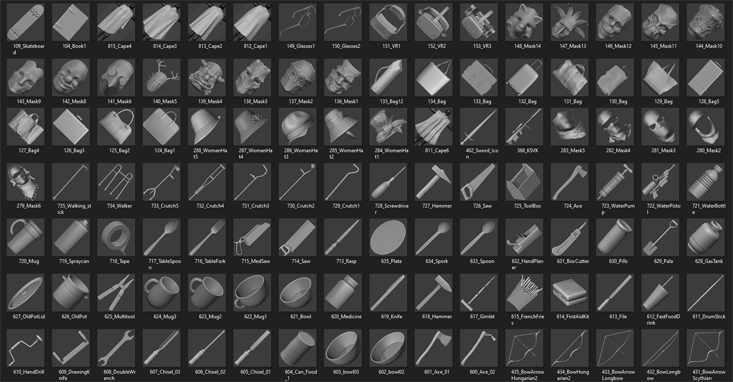
"With the Pose Tool 3D app, you'll have access to a wide range of posing features to help you create dynamic and interesting compositions. Whether you're working on a single character or a group scene, this app has everything you need to bring your ideas to life. "In addition to its powerful posing capabilities, the pose tool 3d app also comes with a variety of everyday objects and weapons that can be attached to the figures' hands and body parts. This allows you to add even more depth and detail to your compositions and helps bring your characters to life in a more realistic and immersive way.
Whether you're creating a simple portrait or an epic battle scene, the objects and weapons in this app will help you achieve the look and feel you're going for. One of the key benefits of the pose tool 3d app is its ability to help you visualize the 3d human figure in different drawing modes. Whether you prefer to work in 2D or 3D, this app has you covered. You can switch between different drawing modes to find the one that works best for you.
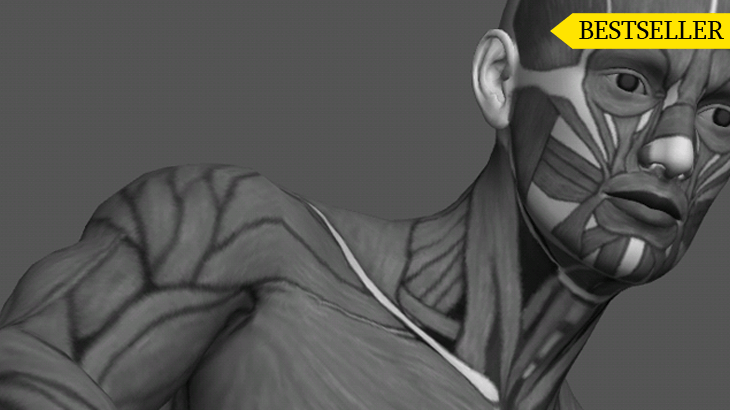
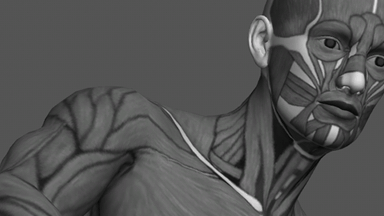
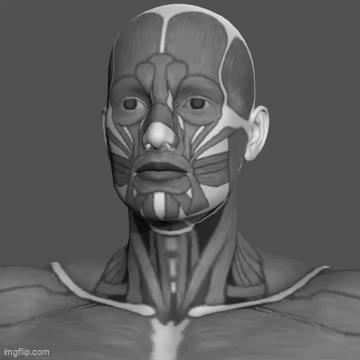
"Another great feature of the Pose Tool 3D app is the inclusion of muscle maps on the figures. These maps allow you to see exactly how the muscles in the body move and flex as you pose the figure, giving you a deeper understanding of anatomy and helping you create more realistic and believable poses. Whether you're a beginner artist learning about anatomy or an experienced professional looking to fine-tune your skills, the muscle maps in this app are an invaluable resource. So don't wait any longer - download the pose tool 3d app today and start using these amazing muscle maps to take your art to the next level!"
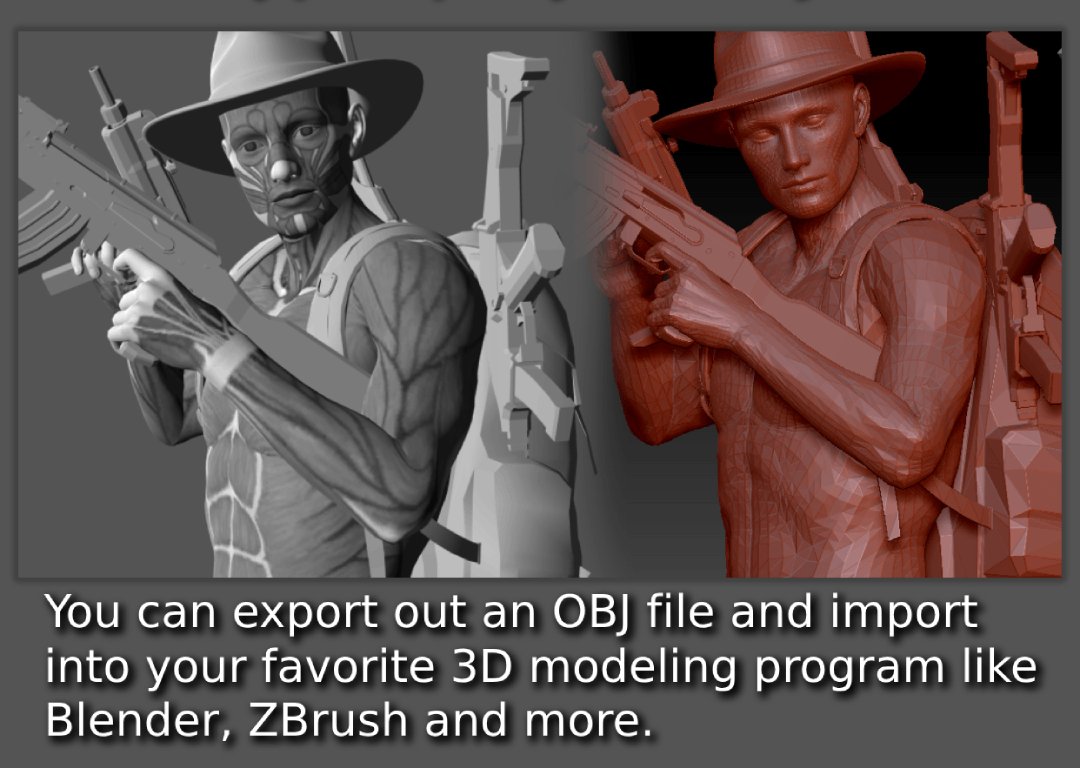
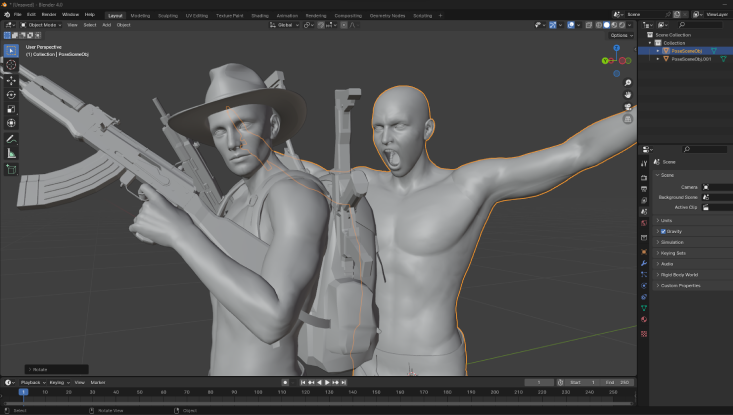
You can export out an OBJ file and import into your favorite 3D modeling program like Blender, zBrush and more.
 Check out these other amazing features


NEW FEATURES ADDED WITH EACH NEW UPDATE
Android & IOS
One Finger = Orbit Scene
Two Finger = Pan / Zoom (Pinch to Zoom)
One Finger Tap = Select Body Parts
3 BUTTON MOUSE SUPPORT
PC VERSION POSE TOOL 3D
PC/Mac/Android
On PC/Mac or if your mobile device supports using a mouse such as on
Android, you can use a 3 button mouse to navigate 3D scene. Pose Tool 3D Pro
is designed to be used with 3 button mouse on desktop computers.
Left Click = Orbit Scene / Select Body Parts
Scroll Wheel = Zoom
Right Click = Pan
Pose Tool 3D is very simple to use and understand. You
simply click on a body part of any figure and pose with Green, Blue, Red
circles on the left of screen.

You can move the entire currently active figure using the
Move, Up/Down, Rotate icons on the left of screen.

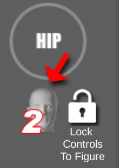
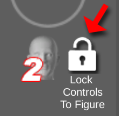
You can lock the pose controls to the active figure which
will allow you to only select that figure through other figures. Important
feature to use for tight complex posing.
Pose Tool 3D is a state of the art posing app designed for
artists in mind by Riven Phoenix. It does not use constraints on posing body
parts. This allows artists to create from simple to very complex dynamic
poses for illustrations, comic books, manga, storyboarding, etc.
 We strongly recommend you act out the pose or use a reference photo as a
starting point to get best results. We don't recommend using only your
imagination to create extreme poses.
We strongly recommend you act out the pose or use a reference photo as a
starting point to get best results. We don't recommend using only your
imagination to create extreme poses.
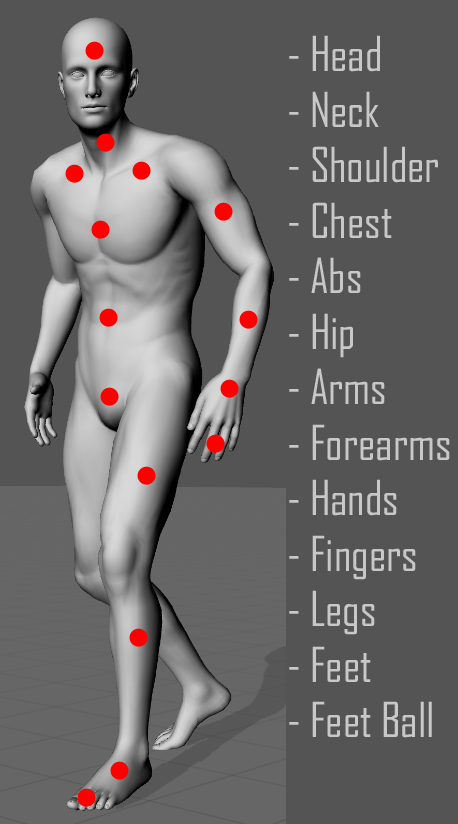
You can select the following body parts all the way down to
the fingers of the hand.
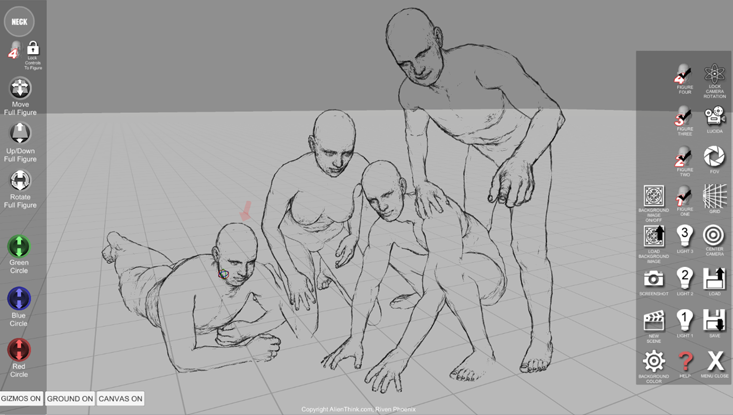
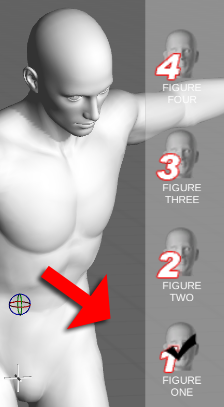
This brings us to an important and simple concept. You can
have max four figures in a scene. When you select a body part of a figure,
that figure becomes the currently active figure. The pose buttons will work
for that specific figure.
 You can tell which figure is active by looking at a number of screen gizmos
on screen. The currently selected figure icon on top left of screen will
change from 1, 2, 3 or 4. This icon tells you which figure is active, or the
figure you clicked on.
Notice the padlock icon right next to it. You can lock the pose controls to
the active figure by clicking this icon. This icon allows you to click
through any overlapping figure to only the selected figure.
You can tell which figure is active by looking at a number of screen gizmos
on screen. The currently selected figure icon on top left of screen will
change from 1, 2, 3 or 4. This icon tells you which figure is active, or the
figure you clicked on.
Notice the padlock icon right next to it. You can lock the pose controls to
the active figure by clicking this icon. This icon allows you to click
through any overlapping figure to only the selected figure.
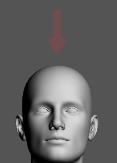
 When a figure is active you will see a faint red arrow on top of the figures
head. The arrow will switch to which ever figure you selected. Selecting any
body part of any figure will make that figure the active figure.
When a figure is active you will see a faint red arrow on top of the figures
head. The arrow will switch to which ever figure you selected. Selecting any
body part of any figure will make that figure the active figure.
When you select a figure, it will become the active figure.
Each figure has its own menu on bottom right. The icon will change based on
which figure you selected.
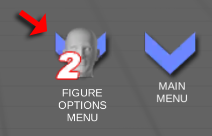 With this menu you can switch between male or female and change the way a
figure displays. This menu will keep track of how each figure is displayed
and is unique to each figure option you selected.
With this menu you can switch between male or female and change the way a
figure displays. This menu will keep track of how each figure is displayed
and is unique to each figure option you selected.
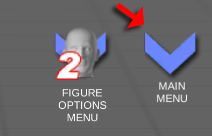
The 'main menu' is where you can turn on/off the four
figures. You can turn on/off figures at any time when you are setting up
your scene. It is best practice to pose one figure at a time. *** Keep in
mind only the figures that are turned on will get saved to a scene file.***
 One other main reason you will want to turn off or hide figures, is so you
can see how to draw your figures one by one when creating or laying out your
illustration, painting, etc. All figures you want to keep must be turned on
before you save, since only the turned on figures will get saved to a scene
file.
One other main reason you will want to turn off or hide figures, is so you
can see how to draw your figures one by one when creating or laying out your
illustration, painting, etc. All figures you want to keep must be turned on
before you save, since only the turned on figures will get saved to a scene
file.
It is a good idea to work with one figure at a time on
screen. When you select a body part of any figure, that figure becomes the
active figure, which means the pose controls will now work for the selected
figure. You can lock the pose controls to only work with the selected figure
by clicking the padlock icon on top left. You will want to use the padlock
feature when you have more then one figure on screen.
Remember, the pose buttons and figure menu are active for the figure you
selected. When we say pose buttons we mean the buttons on the left side of
screen.
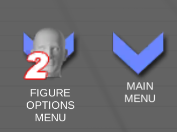
When we say figure menu we mean the 'figure options menu' on the bottom
right of screen.
Notice the 'main menu' right next to 'figure options menu', this is where
you can turn on/off figures when you are starting out to stage your scene.
Once you get the hang of the app, you can work with multi figures at the
same time on screen, You will get used to knowing the pose buttons and
figure menu are active for the figure you selected.
TIP - Only 'Light 1' can cast shadows. You can turn off the
shadow option on 'Light 1' to make the app run faster on smaller devices.
'Light 1' can be found on the main menu. Click it and turn off shadows.

You will notice there are two menus on the bottom right of
screen. The first menu will show you display options for the currently
selected figure. The second menu is your main menu.
 The 'main menu' is where you can turn on/off figures, as well as control
lights, display a grid, etc. 'Main menu' is where you do global things in
your scene. The 'figure menu' is where you do local things to the selected
figure. like how each figure is displayed in your scene. As an example, when
you are navigating your scene with touch, you might want to reset the camera
position. In this case you would click the 'Center Camera' icon in the 'main
menu'. You do this because the camera is part of the global scene.
The 'main menu' is where you can turn on/off figures, as well as control
lights, display a grid, etc. 'Main menu' is where you do global things in
your scene. The 'figure menu' is where you do local things to the selected
figure. like how each figure is displayed in your scene. As an example, when
you are navigating your scene with touch, you might want to reset the camera
position. In this case you would click the 'Center Camera' icon in the 'main
menu'. You do this because the camera is part of the global scene.

Before we explain what each icon does, it is important to cover the basics. As you can see there are 3 things to keep in mind. When you start Pose Tool 3D you will see a figure, its pose buttons on left of screen and the menu systems on bottom right of screen. Lets cover first what you are seeing on screen.
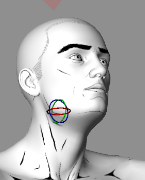
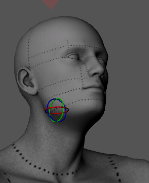
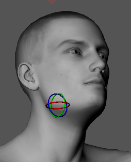
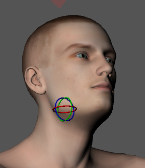
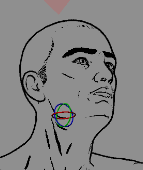
 When you select a body part, this icon will show you which
body part you selected. It is displayed on top left of screen. Keep in mind
you are using touch sensitive devices to select body parts. Keep your eye on
this icon to know which body part you have selected when unsure.
When you select a body part, this icon will show you which
body part you selected. It is displayed on top left of screen. Keep in mind
you are using touch sensitive devices to select body parts. Keep your eye on
this icon to know which body part you have selected when unsure.
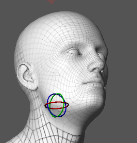
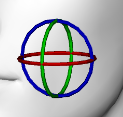 When you select a body part, this gizmo will tell you which axis a body part
can move on using the pose buttons. You can turn off all gizmos by clicking
the gizmo button on the bottom left.
When you select a body part, this gizmo will tell you which axis a body part
can move on using the pose buttons. You can turn off all gizmos by clicking
the gizmo button on the bottom left.

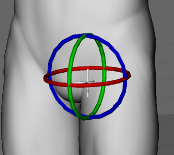 When you select the hip, a larger 3D gizmo will show. The hips will allow
you to rotate the full figure; this is why the 3D gizmo appears larger.
Remember you can also 'move', 'up/down', 'rotate' the full figure using the
grey pose buttons. This will allow you to set up figures in very complex
poses.
You can turn off all gizmos using the gizmo button on the bottom left.
When you select the hip, a larger 3D gizmo will show. The hips will allow
you to rotate the full figure; this is why the 3D gizmo appears larger.
Remember you can also 'move', 'up/down', 'rotate' the full figure using the
grey pose buttons. This will allow you to set up figures in very complex
poses.
You can turn off all gizmos using the gizmo button on the bottom left.
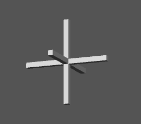 The camera orbit axis shows you where the center point the camera is
pointing at. This axis is fixed and travels with the camera. You can
navigate your scene using this axis to know where you are inside your 3D
scene. It helps you to position the camera by using zoom, pan and orbit on a
body part. You can turn off all gizmos by clicking the gizmo button on the
bottom left.
The camera orbit axis shows you where the center point the camera is
pointing at. This axis is fixed and travels with the camera. You can
navigate your scene using this axis to know where you are inside your 3D
scene. It helps you to position the camera by using zoom, pan and orbit on a
body part. You can turn off all gizmos by clicking the gizmo button on the
bottom left.
When you select any body part of any figure, that figure will become the
active figure. The faint red arrow lets you know which figure you are
working with. You can turn off all gizmos by clicking the gizmo button on
bottom left.
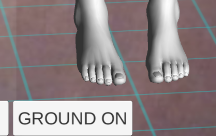
 The ground plane is displayed by default. You can turn on/off the ground by
clicking on the 'ground on' button. When you use the camera lucida feature
the ground will become transparent grid lines so you can still see the
ground to help figure out perspective. This will also be the same when you
display a background image.
The ground plane is displayed by default. You can turn on/off the ground by
clicking on the 'ground on' button. When you use the camera lucida feature
the ground will become transparent grid lines so you can still see the
ground to help figure out perspective. This will also be the same when you
display a background image.
When you select a body part of a figure, that figure becomes the active
figure. All pose controls will work with the selected figure. The pose
controls will always switch to whatever figure body part you selected. This
means if you select a body part of a different figure, that figure will
become the active figure and the pose controls will work for that figure.
This is where you want to use the padlock feature. You can tap on the
padlock to lock the controls to the figure you want to pose, or work with.
Clicking on a different figure's body part will not switch the pose controls
to that figure. This will allow you to pose the figure you want to
concentrate on. Note the padlock will auto unlock when you enable or disable
figures in the 'main menu'.

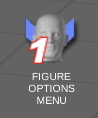
The 'figure options menu' icon will change based on the figure you have
selected. It will say 1, 2, 3 or 4. This tells you which figure you have
selected and the options this menu displays will be unique for that selected
figure. When we say unique, we mean how each figure is displayed in the
scene.
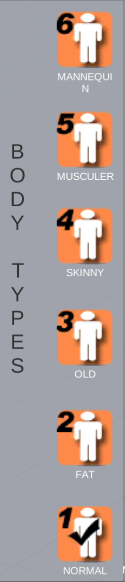 You can select from 6 different body types per figure. Normal, Fat, Old,
Skinny, Muscular, Mannequin. Only one body type can be selected per figure.
This is also true when you switch the figure to female. The female version
will give you the same options.
You can select from 6 different body types per figure. Normal, Fat, Old,
Skinny, Muscular, Mannequin. Only one body type can be selected per figure.
This is also true when you switch the figure to female. The female version
will give you the same options.
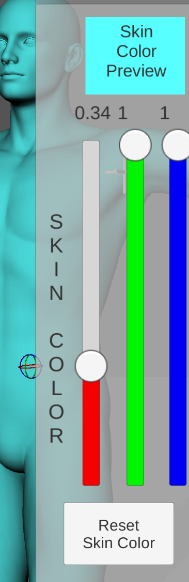 You can change the skin color of each figure. Since you can have max four
figures, they each can have a different color. Skin Color feature will work
on all body type icons and draw modes Icons shown below.
You can change the skin color of each figure. Since you can have max four
figures, they each can have a different color. Skin Color feature will work
on all body type icons and draw modes Icons shown below.

 You can switch a figure to male or female at any time. When you pose your
figure, both the male and female figure will have the same pose. This makes
it easy to switch between genders at any time.
You can switch a figure to male or female at any time. When you pose your
figure, both the male and female figure will have the same pose. This makes
it easy to switch between genders at any time.
 You can reset a figures pose to start again. You will get 3 options when you
click this icon.
You can reset a figures pose to start again. You will get 3 options when you
click this icon.
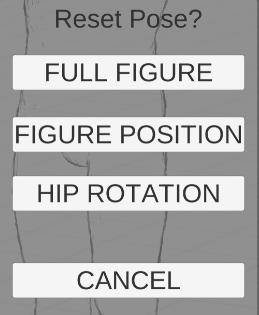 'FULL FIGURE' - This will reset the pose for the whole figure including hips
but it will not reset figure position.
'FULL FIGURE' - This will reset the pose for the whole figure including hips
but it will not reset figure position.
'FIGURE POSITION' - This will only reset the figures position. The figure
will move to its starting location only, This will not reset the pose.
'HIP ROTATION' - This will only reset the hip rotation. It will not reset
the figure position or the figure pose.
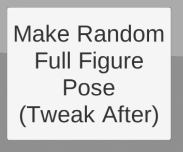
 You can generate a random pose to get started. Keep clicking the button
'Make Random Full Figure Pose' until you get a pose you like. The idea here;
is you want to tweak the pose later. You can only tweak the pose by exiting
the random pose menu.
You can generate a random pose to get started. Keep clicking the button
'Make Random Full Figure Pose' until you get a pose you like. The idea here;
is you want to tweak the pose later. You can only tweak the pose by exiting
the random pose menu.
 You can click on revert pose to go back to the pose you started with. The
way this works is when you click on the random pose icon, the app captures
the pose you started with. So if you generate a random pose then exit this
feature, that will become the new pose. If you go back to random pose, this
new pose is what will be considered the revert pose.
You can click on revert pose to go back to the pose you started with. The
way this works is when you click on the random pose icon, the app captures
the pose you started with. So if you generate a random pose then exit this
feature, that will become the new pose. If you go back to random pose, this
new pose is what will be considered the revert pose.

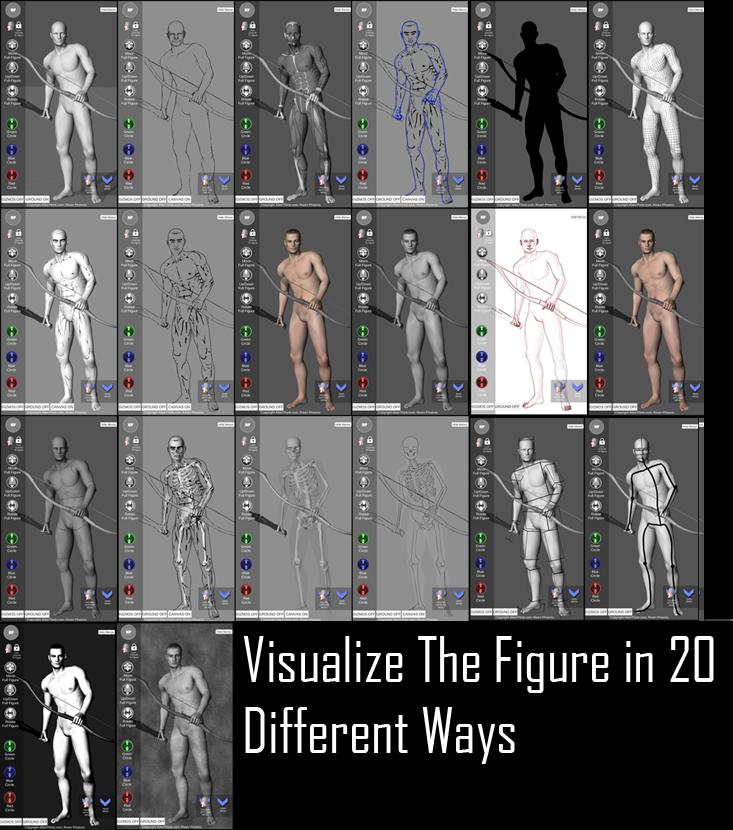
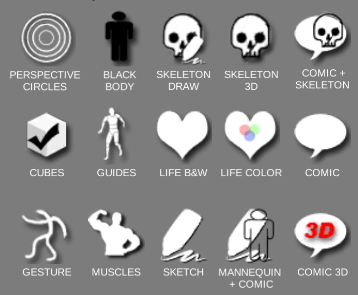 You can turn on/off a draw mode. Click the icon once to turn it on, or click
icon again to turn it off. You can also just switch between draw modes and
they will auto switch. You do however need to click on the last draw mode
again to turn it off. Check mark means its on, no check mark means its off.
You can turn on/off a draw mode. Click the icon once to turn it on, or click
icon again to turn it off. You can also just switch between draw modes and
they will auto switch. You do however need to click on the last draw mode
again to turn it off. Check mark means its on, no check mark means its off.

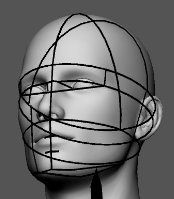
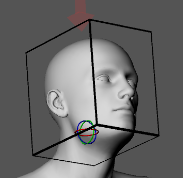
 You can turn on gesture lines to see the flow of the figure. This also comes
with a cage around the human head so you can use it to layout your lines
when drawing heads.
You can turn on gesture lines to see the flow of the figure. This also comes
with a cage around the human head so you can use it to layout your lines
when drawing heads.
 You can turn on cubes to see which way each body part is pointing in 3D
spaces. This is a great feature to figure out perspective for your drawings.
You can turn on cubes to see which way each body part is pointing in 3D
spaces. This is a great feature to figure out perspective for your drawings.
 This mode will turn on muscle maps. You can use this mode to study how human
muscles wrap around the human body.
This mode will turn on muscle maps. You can use this mode to study how human
muscles wrap around the human body.

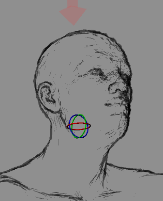
 This mode will draw the figure in very sketchy lines. Very powerful way to
figure out how to create your drawing on paper. Use it as a guide to help
you work faster. Its also a great mode to use to practice your figure
drawing.
This mode will draw the figure in very sketchy lines. Very powerful way to
figure out how to create your drawing on paper. Use it as a guide to help
you work faster. Its also a great mode to use to practice your figure
drawing.
 This mode will project comic lines on top of a blue line drawing of the
mannequin.
This mode will project comic lines on top of a blue line drawing of the
mannequin.
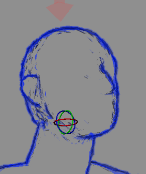
 You can see just the blue line mannequin drawing by selecting
Body Type 6.
You can see just the blue line mannequin drawing by selecting
Body Type 6.

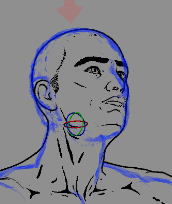
 This mode will project comic lines on a 3D figure. You will want to use this
feature when drawing out comic book characters, or any kind of illustration
where you want to see the comic lines with shading guides.
This mode will project comic lines on a 3D figure. You will want to use this
feature when drawing out comic book characters, or any kind of illustration
where you want to see the comic lines with shading guides.
 This mode will show you important guides on the human face. You will also
see dots around the body parts. Its a more realistic mannequin system. Its
very useful to figure out shading.
This mode will show you important guides on the human face. You will also
see dots around the body parts. Its a more realistic mannequin system. Its
very useful to figure out shading.
 This mode will show the figure in B&W with a realistic texture. Use it for
painting reference or drawing or to figure out shading.
This mode will show the figure in B&W with a realistic texture. Use it for
painting reference or drawing or to figure out shading.
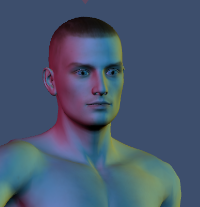
 This mode will show the figure in full color with a realistic texture of the
human body. Use it as a reference to create your paintings, or just to
figure out how color works with the 3 point lighting system.
This mode will show the figure in full color with a realistic texture of the
human body. Use it as a reference to create your paintings, or just to
figure out how color works with the 3 point lighting system.
 This mode will show the figure in comic book lines. Idea here is to use the
lines as guides. Use the lines you find useful in drawing comic or manga
illustrations. Not all lines have to be used in your art.
This mode will show the figure in comic book lines. Idea here is to use the
lines as guides. Use the lines you find useful in drawing comic or manga
illustrations. Not all lines have to be used in your art.
 This mode will map perspective circles around the figures body parts. Very
powerful way to understand foreshortening. You can also use this feature as
a guide to figure out how clothing needs to wrap around the body.
This mode will map perspective circles around the figures body parts. Very
powerful way to understand foreshortening. You can also use this feature as
a guide to figure out how clothing needs to wrap around the body.
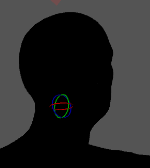
 This mode will show a silhouette of your pose. Silhouettes are powerful way
to make sure your pose is telling a story. What is your pose trying to say?
Is the pose drinking a cup of coffee? Does it make sense?
This mode will show a silhouette of your pose. Silhouettes are powerful way
to make sure your pose is telling a story. What is your pose trying to say?
Is the pose drinking a cup of coffee? Does it make sense?
 This mode will show the skeleton in line art. This feature is great when you
need to draw out a skeleton for your illustrations.
This mode will show the skeleton in line art. This feature is great when you
need to draw out a skeleton for your illustrations.
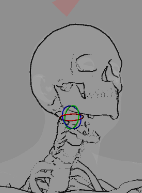
 This mode will show you a 3D skeleton of your pose. You can get a better
understanding of the human figure when you can understand how bones work
inside your figures pose.
This mode will show you a 3D skeleton of your pose. You can get a better
understanding of the human figure when you can understand how bones work
inside your figures pose.
 This mode will project a comic figure on top of a 3D skeleton. You can make
sense of comic lines when you can see the structure of the human body from
inside.
This mode will project a comic figure on top of a 3D skeleton. You can make
sense of comic lines when you can see the structure of the human body from
inside.
 The main menu is where you do global things in your scene, such as 3 point
lighting system, grids, save and load a scene, etc.
The main menu is where you do global things in your scene, such as 3 point
lighting system, grids, save and load a scene, etc.

 You can save 40 scenes. Click the save icon to save a scene. **Only active
figure that show on screen will get saved***. When you have no active
figures on screen then only an empty scene will get saved.
You can save 40 scenes. Click the save icon to save a scene. **Only active
figure that show on screen will get saved***. When you have no active
figures on screen then only an empty scene will get saved.
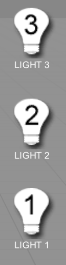 Only 'Light 1' can cast shadows. On smaller moblie devices you should turn
off shadows to make the app run faster. Click the 'Light 1' icon from main
menu and uncheck the shadow options box. Use a 3 point lighting system to
study how color works or to set up for your painting color study.
Only 'Light 1' can cast shadows. On smaller moblie devices you should turn
off shadows to make the app run faster. Click the 'Light 1' icon from main
menu and uncheck the shadow options box. Use a 3 point lighting system to
study how color works or to set up for your painting color study.
 You can center the camera to its original position if you get lost in the 3D
scene. Just click the button and the camera will reset to its starting
location.
You can center the camera to its original position if you get lost in the 3D
scene. Just click the button and the camera will reset to its starting
location.
 You can turn on gird lines to get a sense of perspective in your scene. When
you turn on grids, you will see 3 buttons on bottom right to turn on/off
grid planes.
You can turn on gird lines to get a sense of perspective in your scene. When
you turn on grids, you will see 3 buttons on bottom right to turn on/off
grid planes.
 You change the camera FOV to get the perspective you want to work with in
your scene. Some illustrations require extreme perspective camera lens FOV.
You change the camera FOV to get the perspective you want to work with in
your scene. Some illustrations require extreme perspective camera lens FOV.
 Camera Lucida is a very powerful feature that allows you to trace your poses
on items using your camera device. You can setup your camera on a tripod and
point at your craft paper, wood, cloth, etc. Than pose your figure and use
the draw mode like 'Sketch' to trace out your figure with a pencil. Perfect
for crafts.
Camera Lucida is a very powerful feature that allows you to trace your poses
on items using your camera device. You can setup your camera on a tripod and
point at your craft paper, wood, cloth, etc. Than pose your figure and use
the draw mode like 'Sketch' to trace out your figure with a pencil. Perfect
for crafts.
 You can lock the camera rotation. You can still zoom and pan in your scene.
You will want to use this feature when you want to study your figures pose.
You can lock the camera rotation. You can still zoom and pan in your scene.
You will want to use this feature when you want to study your figures pose.
 You can take a screenshot of the scene which will be saved to your device
photo album.
You can take a screenshot of the scene which will be saved to your device
photo album.
 You can start a new scene when you click this button.
 You can load a background image from your device photo album. Rotate your
device for best fit.
You can load a background image from your device photo album. Rotate your
device for best fit.
 You can turn on/off the background image you loaded from your device photo
album. Click icon to turn on, click again to turn off.
You can turn on/off the background image you loaded from your device photo
album. Click icon to turn on, click again to turn off.
 You can change the sky color. Note you will need to hide the ground plane to
see the background color.
You can change the sky color. Note you will need to hide the ground plane to
see the background color.
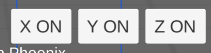
 You can have max four figures in a scene. You can turn on/off figures you
want to work with in your scene. **Only figures that are turned on will get
saved to your scene**
You can have max four figures in a scene. You can turn on/off figures you
want to work with in your scene. **Only figures that are turned on will get
saved to your scene**